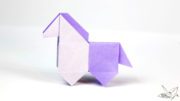
Learn how to make a cute Origami Pony. This is the 2nd version of my Origami Horse. The main and tail are one colour, the rest is the other colour – make using one sheet of square paper.
This origami horse looks the same on both sides and stands up. It has a nice closing at the end and requires no glue.
The difference between this one and Version 1 is the mane and tail colour. The paper is folded into fifths instead of quarters at the start. This leaves extra space to create the completely one-coloured body.
Design: © Paper Kawaii Copyright Information
Level: ★★★★☆ (make version 1 first if you have trouble)
You will need:
▸ 1 sheet of square paper. Example: 15 x 15 cm
Final model: 7 x 5.5 cm
✅ Paper used in the tutorial can be bought here.
You can use whatever size you want, I just used larger paper so that it’s easier to see.

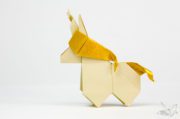
The origami horses are best folded using paper that’s got two different coloured sides! But using solid coloured paper is nice too!

The horse on the left is Origami Horse Version 1, and is folded from 17 x 17 cm paper, the horse on the right is folded with 15 x 15 cm paper.